[ AGENT DEEP DIVE ] Flair and Her Tanks

![[ AGENT DEEP DIVE ] Flair and Her Tanks](https://clan.akamai.steamstatic.com/images/45746833/1c44c7e449fd4abfe974b5924edd8262f3da18a0.png)
Who is Flair
Flair is HEAT's stealth and misdirection specialist: a Marksman who wins fights by controlling when and where she's seen, not by trading shots head-on. If you're new to HEAT, an Agent is the character behind the wheel, and each Agent brings a signature Trait and Ultimate to their own vehicles (see the Game Guide for the basics). For Flair, that kit is built entirely around picking your moment: staying hidden until the fight favors you, then striking before the enemy even knows you were there.

*Flair, HEAT's stealth and misdirection specialist.*
Echo Proxy
Flair's Ultimate is all about creating tactical opportunities through misdirection and repositioning. By deploying a proxy, you put a second presence on the battlefield that can confuse enemies, draw attention, or set up a play for later. Swapping control at the right moment lets you surprise opponents, escape a dangerous fight, or attack from an angle nobody is watching.
That flexibility comes with a real risk: whichever vehicle you're not controlling stays exposed and can still be damaged or destroyed while your attention is elsewhere. Getting value out of Echo Proxy means thinking ahead: plan where the proxy will actually be useful, and choose your moment to take control deliberately rather than reactively.
For example: your team is pushing base A on Conquest on Moonshot, but you expect the enemy to counterattack base B. Deploy your proxy near base B in a safe position before you commit to the fight at base A. If the enemy starts capturing the objective or tries to flank your team, swap control to the proxy immediately and respond without leaving your position at base A.
Placement is most of the game here. A well-positioned proxy gives you a safe fallback, lets you rotate quickly between key areas of the map, and doubles as an escape route if you're under pressure. Think of it as a second foothold on the map rather than a spare vehicle: using it to relocate saves real time and keeps you in the fight instead of stuck crossing the map in your main tank.
*Echo Proxy: deploy a proxy, then swap control to strike from an angle no one is watching.*
Signature Masking
Signature Masking rewards careful positioning and disciplined engagements. Once your Energy reaches 70, the effect kicks in after a 3-second delay: your vehicle stays fully visible in the world, but it drops off enemy battle HUDs and can't be targeted by lock-on abilities. That makes it much harder for opponents to track your movements or react to your positioning.
The Trait works best when you're relocating, setting up an ambush, or approaching a fight from an unexpected direction. Firing your main gun, taking damage, or getting Jammed breaks the effect (it lingers for about a second after you fire before dropping off), and it goes on a 20-second cooldown, so getting the most out of Signature Masking comes down to choosing the right moment to reveal yourself.
*Signature Masking: drop off enemy battle HUDs, then reposition or set up an ambush before you're seen.*
Leopard 2FK
The Leopard 2FK is built around deception, positioning, and controlled engagements. Its abilities help it stay off enemy HUDs, disguise itself as wreckage, and survive at range when spotted. It isn't a tank for constant head-on fighting. Instead, it works best when you choose your position carefully, wait for the right opening, and strike from places the enemy isn't already watching.
How to play it
To get the most out of the Leopard 2FK, avoid rushing into every fight. Use Signature Masking to move into better positions without drawing immediate attention, and use Feign Death to hide in plain sight or wait out a dangerous moment. When you're ready to attack, your HEAT ATGMs deal reliable damage and destroy tracks, making it easier to stop enemies from escaping or pushing forward.
Once your position is exposed, don't stay there for long. Use Electro-Optical Jammers to reduce how hard the enemy can punish you at range, then relocate and look for your next opening. The Leopard 2FK performs best when you stay patient, pick your fights, and keep enemies guessing about where the next shot is coming from.
Keep in mind that your HEAT ATGMs need guidance after firing. That means you'll often need to stay exposed longer than with conventional shells, so watch enemy sightlines and avoid firing from a position where you can be easily punished mid-guide.
*Feign Death: the Leopard 2FK disguises itself as wreckage to wait out a dangerous moment.*
*Electro-Optical Jammers degrade enemy accuracy against you at range.*
Leopard 2KST
The Leopard 2KST is a stealth-focused vehicle that excels at gathering information, controlling key areas, and disrupting enemy movement. With Active Camo, it can infiltrate the battlefield unseen, while its EMP Trap slows advancing enemies and creates opportunities for both you and your team. Getting the most from the Leopard 2KST comes down to careful positioning, smart ability usage, and choosing the right moment to reveal yourself.
How to play it
Success in the Leopard 2KST comes from staying one step ahead of your opponents. Use Active Camo to reach strong positions, scout enemy movements, or disengage before the enemy can react. Moving makes your camouflage less effective, so avoid unnecessary movement once you've reached your destination.
Your EMP Trap is most effective when placed where enemies are likely to travel: narrow passages, capture points, or common defensive positions. Rather than throwing it at the first enemy you see, think about where it will have the greatest impact over time. Slowing multiple enemies or cutting off an important route can be just as valuable as the damage it deals.
The Leopard 2KST performs best when it controls the pace of an engagement. Gather information for your team, and force enemies to either avoid your traps or fight on your terms.
*Leopard 2KST: EMP Trap plus Active Camo — lock down a chokepoint, then slip away unseen.*
Recommended Agent Skills
The builds suggested here are just a recommendation — experiment, and share your favorite builds with us on Discord.
These are the Agent Skills we build Flair around: the four that make the pick-your-moment playstyle click.
- Sleight of Hand *(Attribute)*: A -10% to shell reload time that applies while the skill is active in battle. It stacks with everything else pushing your reload speed, so keep it running and more of your shots come around faster.
- Don't Blink *(Ultimate)*: As Flair, you're not running one vehicle: you're swapping between a main tank and a proxy, and this skill shaves a second off that switch. That second is the difference between reacting instantly to a threat and fumbling the handoff. It's what makes the "pick your moment" playstyle work.
- Concealed Impact: Enemies you hit won't see a damage direction indicator. That makes for strong ambush opportunities, and catching enemies when they least expect it often means you get to destroy them before they can react.
- Unseen Fighter: +10% damage on all your main gun shots while Masked, so your opening shot out of Masked hits hardest of all.
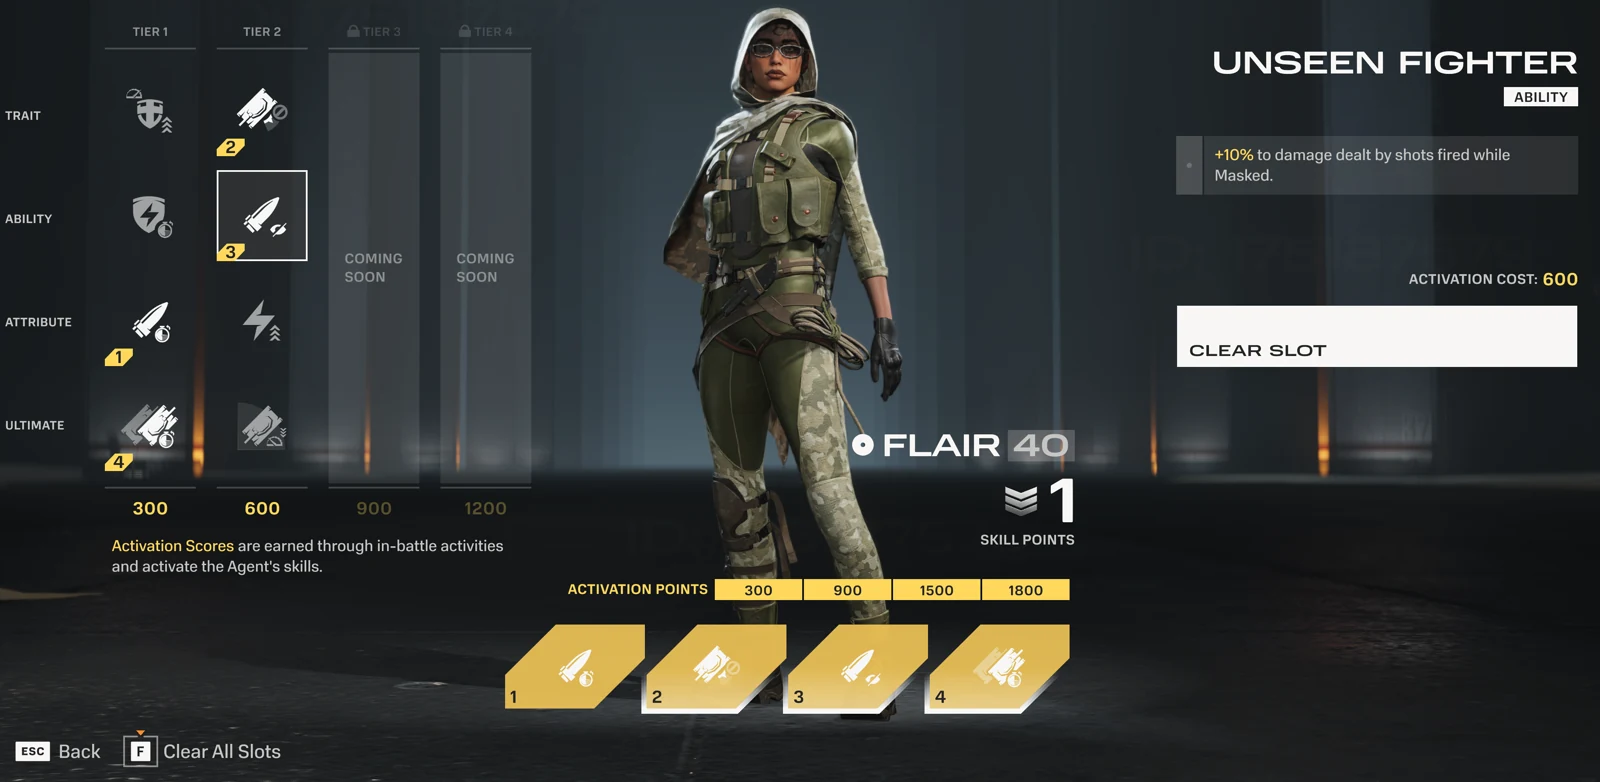
*Flair's recommended Agent Skills loadout.*
Important: Builds accurate as of patch 1.1.0 (July 2026). Upcoming balance updates may change module behavior.
Leopard 2FK build
- Slot 1: ARA — Reduces the energy cost, making it cheaper to bail out of a losing engagement or reset aggro.
- Slot 2: USCA-67-33 — Your survivability core. Taking heavy damage automatically triggers Warded. Your main strength from this module alongside Warded is the increase to ability duration, which lets you hold long-range duels for longer.
- Slot 3: TANZÉ — A straightforward reload speed booster: more shots per minute across the board.
- Slot 4: Shillelagh 2B — This is the build's centerpiece. Go Masked, land a kill shot, and your Energy fully refills, letting you chain ambushes instead of waiting to regenerate. On top of that, you get an increase to your ATGM's alpha damage and a faster reload, so more of your damage output comes from this one module.
- Slot 5: MB839 KA500 — Use Boost not just for repositioning speed, but to actively burn off negative status effects faster. The extra engine power also helps you accelerate away from a fight or reposition into the next one.
- Slot 6: VW-175U — A massive camouflage bonus that supports the stealth theme, though it slightly offsets the Electro-Optical Jammers and Feign Death savings from your ability modules, so keep that in mind. It's still a must-have in combination with the Phantom Curtain equipment item, which lays down a smoke screen you can use both offensively and defensively. When peeking to take shots or duels against enemies, you now have not only your Electro-Optical Jammers at your disposal, but the smoke as well.
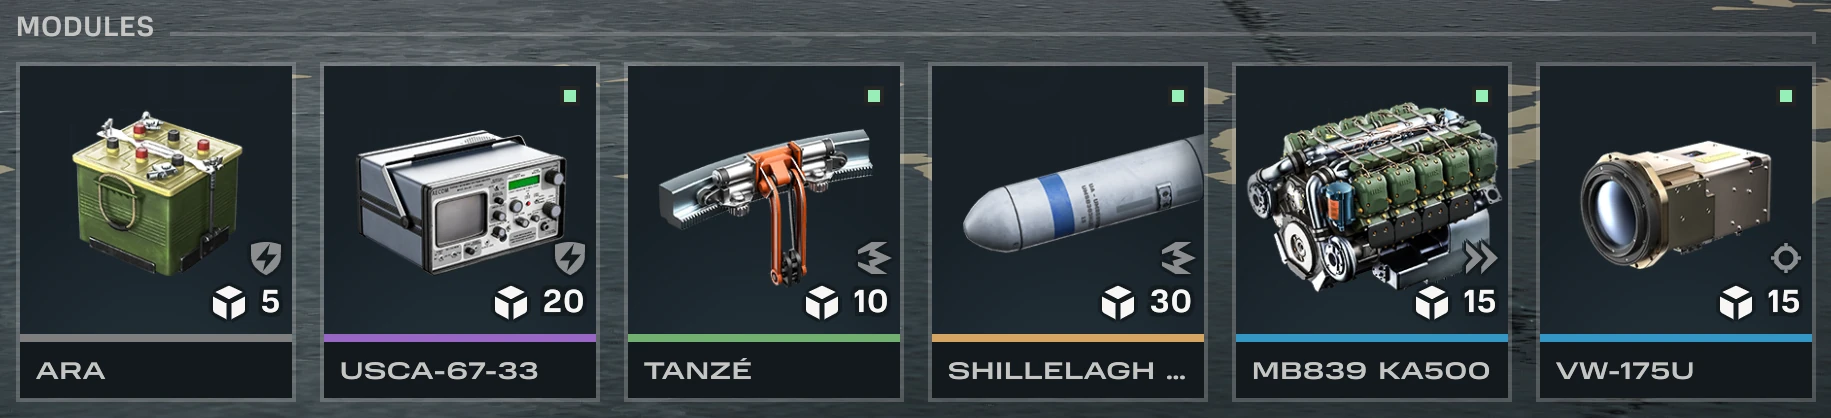
*The full Leopard 2FK module build.*
Why it works together
Everything ties back to the same idea: minimize the number of moments you're actually vulnerable, and make the moments you choose to be seen count for as much as possible. The camouflage tools keep you out of fights you don't want. The Warded bonus means getting caught doesn't always end in a death sentence. And Shillelagh 2B, Concealed Impact, and Unseen Fighter all sharpen the same single action, the Masked kill shot, into something that hits harder, refills your Energy on the kill, and leaves the enemy with no idea where to shoot back.
The trade-off: guided ATGMs
One thing worth being upfront about: the Leopard 2FK's HEAT ATGM shells still have to be manually guided to the target. That's the real cost. You don't just fire and forget: you fire and steer, which means for the missile's whole flight time you're exposed. If someone spots you mid-guide, you can't just bail: breaking off early means you eat the reload and get nothing for it. Masked helps you get to the shot unseen, but it doesn't help you during the shot if you're spotted by the enemy. That vulnerability window is the actual price of this build's damage.
If that trade-off doesn't sit right, there's an alternative: the VGS-152G. It changes the firing type to single-shot and gives a big jump in missile acceleration. That option is basically the answer to the exposure problem: less time in flight means less time standing still. It also comes with solid crit modifiers across ammo, engine, and fuel.
The catch is that VGS-152G and Shillelagh 2B are both Legendary gun modules, and you can only run one Legendary at a time. So it's a real either/or: keep the Masked-synergy playstyle Shillelagh 2B is built around, or trade that away for a faster missile.
If you go with the VGS-152G, that leaves Slot 4 open, and a good pick is the Peri R19A1 for even more acceleration on top of that same idea. It costs you some ATGM alpha damage compared to Shillelagh 2B, but if you're spending that much time standing still guiding a shot, you're better off getting in and out faster than hitting harder and staying exposed longer.
Important: Builds accurate as of patch 1.1.0 (July 2026). Upcoming balance updates may change module behavior.
Leopard 2KST build
- Slot 1: MUKS 1 — Active Camo gains a second charge, along with Lucky Strike (+20% penetration) and Eagle Eye (-20% reticle size) while it's active. The real value isn't the stat bump, though, it's the extra charge itself. Two uses instead of one means you can reposition or slip into an ambush angle, and if that doesn't pan out, you've still got a second charge to get out clean or try again elsewhere, instead of being stuck exposed after using your only one.
- Slot 2: EFN-1070 — EMP Trap, mostly for area denial. Since you're playing at range rather than brawling, you can drop this somewhere along a likely approach and it does its job without you needing to be anywhere near it. It's not central to the damage loop, but it can shut down someone pushing your position right as you're lining up a shot.
- Slot 3: ZASUW-NA — An extra shell in the count, and every critical hit restores energy. At long range, landing a critical hit is harder to guarantee than up close, so this rewards the shots that do land clean instead of assuming a steady stream of them. More shells also means more looks at a target before you need to fall back and reload.
- Slot 4: VSB-1246 — Speed while Masked, plus better hull traverse. This isn't about closing distance: it's about relocating between shots. Firing from range means you need to reposition often so you're not returning fire from the same spot you were just spotted from, and this is what gets you to the next firing line quickly. Losing a bit of raw engine power is a small cost for that.
- Slot 5: HGN-732AA — This is the engine behind the whole strategy. While you're Masked, you get access to Empowered or Charged Explosion for extra energy: that's +30% to either your main gun damage or your ability damage, on top of HEAT shells' already-consistent damage regardless of range. You do lose some zoom magnification on higher scopes, which stings slightly for a long-range playstyle, but the damage window is worth it.
- Slot 6: CAT 26 — This is what makes the whole rhythm work. Once your magazine runs dry, energy regeneration jumps by 150%. Since you're not holding a firing line and slugging it out, you're better off emptying what you have, falling back to cover, and coming back around fully recharged than sitting exposed reloading in the open. The trade-off is a longer gun reload time, but you're not trying to reload fast: you're trying to recharge fast and reappear somewhere new.
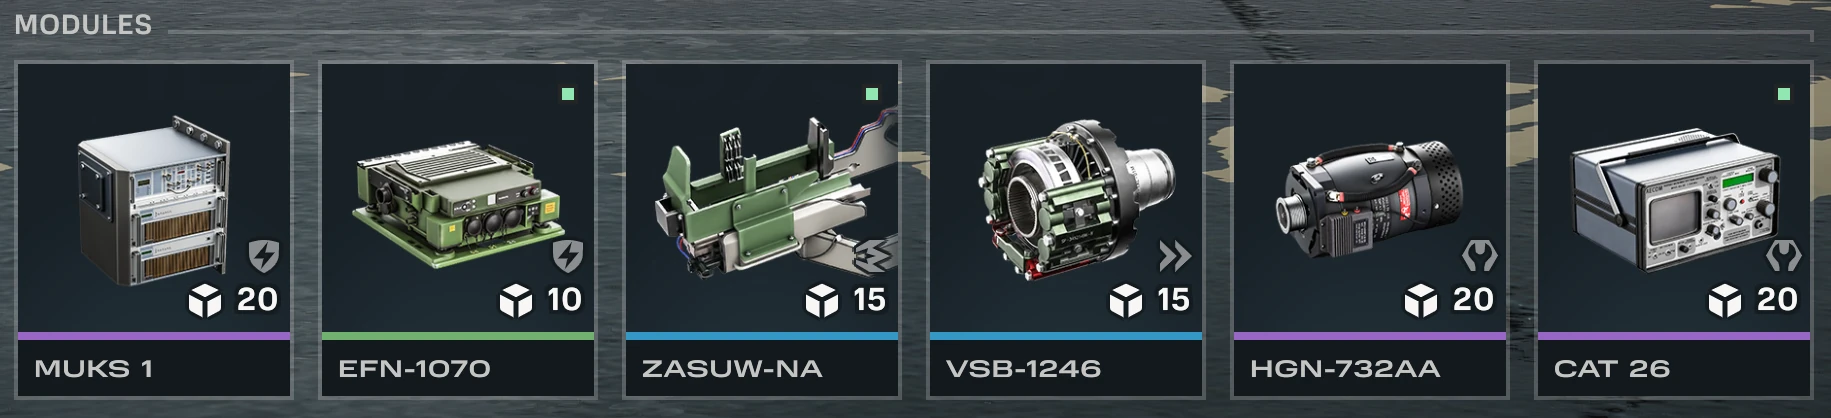
*The full Leopard 2KST module build.*
Why it works together
The whole build leans on HEAT shells' biggest advantage: they hit just as hard at long range as they do up close, so you don't have to close distance or fight for an ideal angle the way other shell types might. That means you can sit back, use Active Camo's extra charge to slip into a good firing line, and get the same damage output you would from point-blank.
Once you're set up, Masked plus HGN-732AA's damage bonus turns a normal shot into a much bigger one, and ZASUW-NA's crit-restore means landing a clean hit partially pays for itself in energy. When the magazine's empty, you're not sticking around to reload in the open: CAT 26's regen spike means you're better off retreating and coming back full than trading shots while exposed, and VSB-1246 is what actually gets you to that next position quickly. EFN-1070 rounds it out as a passive deterrent for anyone trying to push your position while you're mid-rotation.
So the loop isn't "close in, burst, escape." It's "stay at range where HEAT already performs, hit hard from wherever you choose, then relocate before anyone can close the distance on you instead."
---
Get started
Flair rewards patience and timing more than raw aggression. Take her into a match: run the Leopard 2FK for a patient ambush game, or the Leopard 2KST for a hit-and-fade rhythm, and see which one matches how you like to fight. The builds above are a starting point, not a rulebook. Adjust them once you feel where Echo Proxy and Signature Masking fit your own playstyle.